A python Ordnance Survey map viewer, drawn inside Minecraft, on a Raspberry Pi. Just what the world needs… This will also work for Minecraft drawing pretty much any small image, such as a mugshot from a webcam.
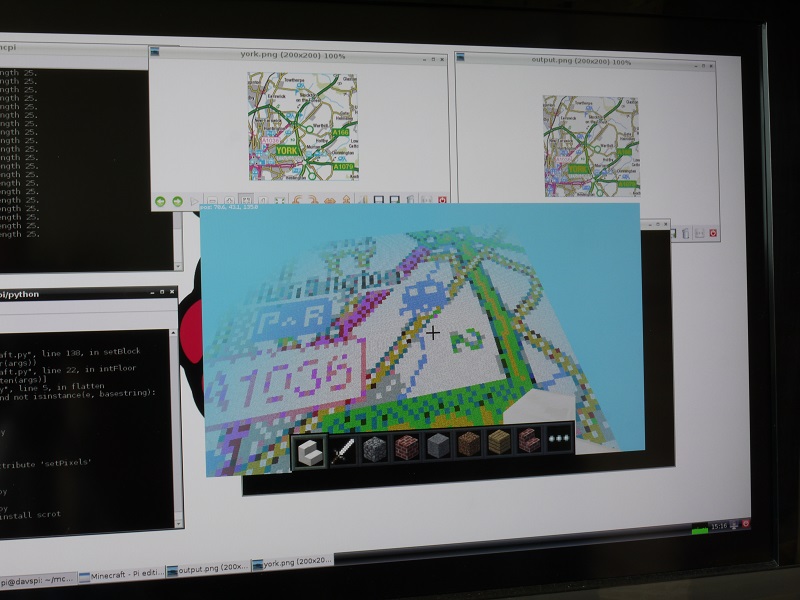
Ordnance Survey map inside Minecraft Pi edition
This idea came to me after I attended the excellent Raspberry Jam in York the other month, a great presentation from Martin O’Hanlon and after a chance remark from @charwarz about drawing a rainbow inside Minecraft, Pi edition (hereafter MCPI). It’s really not all that complicated to do (although I might turn it into a full WMS viewer in the future) and it’s a good catalyst for illustrating how to interact with MCPI from Python and also a bit about image handling. It’s just taken me 6 weeks to find the time to write it up..
The first step is to get your Raspberry Pi set up with Minecraft and the Python API to it. This is as straightforward as following the instructions at http://pi.minecraft.net/ to download and extract the tarball. It’s worth noting that this does need X windows, so you’ll need to either plug in a display to your PI or set up a remote X server.
Minecraft and Python API
MCPI has an easy to use protocol that listens on TCP socket 4711 by default, but we’ll be using the Python API to it because it saves us writing some not terribly interesting code.
The API’s capabilities are defined in mcpi/api/spec/mcpi_protocol_spec.txt, including a link to http://www.minecraftwiki.net/wiki/Data_values_(Pocket_Edition) for the values for blockType and blockData (more on this later). It’s worth noting that the PI coordinate system is cartesian, but uses X and Z for its ground plane and Y is the vector towards the sky. The origin (0,0,0) is the spawn point.
Once minecraft-pi is running in a window, we can open up a terminal window, run python, and make it do our bidding. To do that, fire up a terminal window and type:
  pi@raspberrypi:~/$ cd mcpi/api/python
  pi@raspberrypi:~/$ python
  >>> import mcpi.minecraft
  >>> # open the connection to minecraft
  >>> mc = mcpi.minecraft.Minecraft.create()
  >>> # make some text display in the chat log
  >>> mc.postToChat("Hello World!")
  >>> # get the player's current position
  >>> mc.player.getPos()
  >>> # set the block at position (1,1,1) to stone
  >>> mc.setBlock(1, 1, 1, 1)
This is only some of the API’s capabilities, but we can do an awful lot with just this, such as drawing and animating real objects, making games or making glass tiles appear at the player’s feet, allowing them to free run through mid-air.
Image Quantising
This is the image we’re about to draw inside Minecraft. It’s from the Ordnance Survey’s 1:250,000 raster map, which is licensed under the OS Opendata licence. From a human point of view, this is a section of a map showing the North East of the city of York, but from a computer’s point of view, it’s a 200 pixel square collection of numbers that can be drawn as colours on a screen.
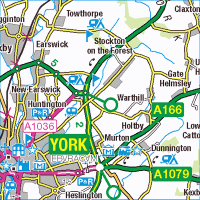
OS 1:250,000 map of North East York.
Contains Ordnance Survey data © Crown copyright and database right 2013
According to the GIMP, this image contains 6902 unique colours, which is going to be difficult to represent within Minecraft because it doesn’t have blocks that come in 6902 different colours. It does, however, come with a set of wool blocks that come in 16 unique colours, which should do the job nicely.
To transform one into the other, we need the Python Imaging Library (PIL) to do some work for us, quantising the RGB image down to match our wool blocks. To do this, it needs to have a palette defined to match each block to its RGB colour.
One way of working out the exact colour value for, say, the Lime Green wool block (TileData 5) would be to fish out its sprite from mcpi/data/images/terrain.png and then take an average of all the pixels in it. That’s a fair amount of leg work, but luckily some generous people at http://teaminterrobang.com/showthread.php?35959-Minecraft-wool-color-Photoshop-ACO-file have already done it for us, so we can describe our palette in python like this:
# palette values taken from http://teaminterrobang.com/showthread.php?35959-Minecra
ft-wool-color-Photoshop-ACO-file
# these could also be worked out from averaging the colours from the sprites in mcp
i/data/images/terrain.png
# and extended by including other block types, but 16 colours works ok
colours = {"White": {"argb": "FFe4e4e4", "tileId": 0},
           "Light Grey": {"argb": "FFa0a7a7", "tileId": 8},
           "Dark Grey": {"argb": "FF414141", "tileId": 9},
           "Black": {"argb": "FF181414", "tileId": 15},
           "Red": {"argb": "FF9e2b27", "tileId": 14},
           "Orange": {"argb": "FFea7e35", "tileId": 1},
           "Yellow": {"argb": "FFc2b51c", "tileId": 4},
           "Lime Green": {"argb": "FF39ba2e", "tileId": 5},
           "Green": {"argb": "FF364b18", "tileId": 13},
           "Light Blue": {"argb": "FF6387d2", "tileId": 3},
           "Cyan": {"argb": "FF267191", "tileId": 9},
           "Blue": {"argb": "FF253193", "tileId": 11},
           "Purple": {"argb": "FF7e34bf", "tileId": 10},
           "Magenta": {"argb": "FFbe49c9", "tileId": 2},
           "Pink": {"argb": "FFd98199", "tileId": 6},
           "Brown": {"argb": "FF56331c", "tileId": 12}}
The PIL function that converts our full colour image into one with a quantised palette looks like this:
outputImage = Image.open("york.png").convert("RGB").quantize(palette = mcImage)
Where mcImage is a PIL image object with its palette set to our collection of colours. We convert our Python data structure into this image using this code:
# store the tileIDs by the offset in the resulting palette List for later lookup
tileIdsByOffset = []
# create our intermediate image to do nothing but hold our palette
mcImage = Image.new("P", (1, 1))
palette = []
for name in colours:
  val = colours[name]["argb"]
  colours[name]["r"] = int(val[2:4], 16)
  colours[name]["g"] = int(val[4:6], 16)
  colours[name]["b"] = int(val[6:8], 16)
  tileIdsByOffset.append(colours[name]["tileId"])
  palette.extend((colours[name]["r"], colours[name]["g"], colours[name]["b"]))

palette.extend((0,0,0) * (256 - len(colours)))
mcImage.putpalette(palette)
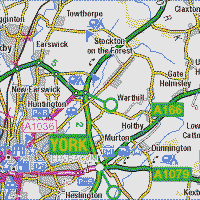
Original map on left, palletised map on right
Bringing it all together
The final step is to take our quantised image and draw it inside MCPI by looping through each pixel in turn and calling MCPI’s setBlock() function with the correct position and blockID and blockData values. This is quite a slow thing to do, so it’s good that we’re only dealing with 40,000 blocks.
mc.postToChat("Starting drawing")
#draw blocks at this height
z = 10
#if we assume the most common colour will be white, we can pre-paint the backgrund to save many setBlock()s
#35, 0 is tileID for wool, tileData for white
mc.setBlocks(0,z,0,WIDTH,z,HEIGHT,35,0)

for x in range(WIDTH):
  for y in range(HEIGHT):
    # fetch the pixel value at the current position, the units are the indexes into our palette
    pix = outputImage.getpixel((x,y))
    if (pix < len(tileIdsByOffset)):
      # lookup the minecraft wool tiledata ID for this palette entry
      tileColour = tileIdsByOffset[pix]
    else:
      # didn't find one, so default to white
      tileColour = 0
    if (tileColour != 0):
      # only draw a block if it's not white. 35 is the block ID for wool
      mc.setBlock(x, z, y, 35, tileColour)
mc.postToChat("Finished drawing")
Once that's finished drawing, we can then fly our around our map inside of minecraft!
Ordnance Survey map inside Minecraft Pi edition
Code
As always, my code is up on Github, but the only really interesting file is the Python script quant.py.
Some ideas I've got for future work are to add a small amount of plumbing that would connect a webcam or picam to a MCPI 'TV' wall and to add a python WMS client that would automatically download and render more map tiles when the player gets within a certain range of the tile edge.
Not belittling your achievement in any way, but have you seen this: http://www.bbc.co.uk/news/technology-24177844
Also, I found this site via your salted caramel ice cream recipe. Will give it a go soon!
Thanks for the link. Yes, I saw that when the OS first announced it earlier on this summer, I think it’s a great achievement for Joesph Braybrook and to the OS for taking the idea and running with it. Not only is it running in the full-fat version of Minecraft, unlike my little painting exercise, but it’s drawn some attention towards the excellent data that the Ordnance Survey makes available.
I did get about half way through adding height data to my Python script to make the atlas data more 3 dimensional, but I got distracted before I finished coming up with a sensible scale for the y axis.