Controlling a Raspberry Pi’s GPIO over the network
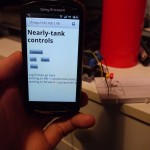
My web user interface controlling LEDs. Bottle of Octomore is optional, but recommended.
The first step in playing with a Raspberry Pi’s GPIO interface is to turn an LED on and off on command, the Hello World of digital electronics. As fun as that is, it would be more fun to do from my mobile phone using my home wireless network, this article runs through the software that I’ve used to do just that. I haven’t said that these techniques allow real-time web control of GPIO pins because they do not, but I get a response time of about 100ms using wireless ethernet with my Pi which does the job for me.
I’m going to be using Python, as it’s a very popular language on the Raspberry Pi, a bit of HTML and Javascript to provide the user interface and some linuxy goodness to glue it all together. There are many other ways of doing this, but this one is mine. I’m glossing over most of the hardware issues, so please be careful not to blow up your Pi.
The steps can be roughly broken down into:
- Hardware and environment set up
- Python and GPIO
- Python, FastCGI and a web server
- HTML and Javascript
Hardware and environment set up
This article intends to focus on the software side of things, so I’m going to assume that:
- you’ve got a fully functioning Raspberry Pi running a reasonably recent build of Raspbian Linux
- that is connected to your home network through wired or wireless
- that your home network has internet access through a router that uses NAT
- that you’re comfortable using your Pi’s command line interface
With those out of the way, you will also need an LED and a resistor (I recommend a 330 ohm resister, but any value between 220 ohms and 3k3 ohms will do for this exercise) and some way of wiring those up to the Pi’s GPIO pins. One of the best ways is to use a breadboard and Adafruit’s Pi Cobbler, but you can also just twist the wires together with insulating tape.
Update 19th May 2013: After a conversation with Thomas, it’s worth noting that you need to be careful not to introduce Windows style line endings if copying and pasting text into your Raspberry Pi. Python itself isn’t bothered by line endings, but the Linux shell interpreter is and it can often fail to find Python if the #!/usr/bin/python line has a Carriage Return as well as a Line Feed on it. If something isn’t quite working as you’d expect, it’s worth a quick check with the Linux ‘file’ utility to see that’s the issue before spending time troubleshooting:
This is what 'file' says for a file with Windows line endings
pi@raspberrypi /tmp $ file foo.py
foo.py: Python script, ASCII text executable, with CRLF line terminators
I've already installed a tool called dos2unix using sudo apt-get install dos2unix
pi@raspberrypi /tmp $ dos2unix foo.py
dos2unix: converting file foo.py to Unix format ...
Check it again, this time it's UNIX line endings and it's reported like this:
pi@raspberrypi /tmp $ file foo.py
foo.py: Python script, ASCII text executable
pi@raspberrypi /tmp $
Connect the LED and resistor in series between the Pi’s ground pin and one of its GPIO pins, I’ve used 18.
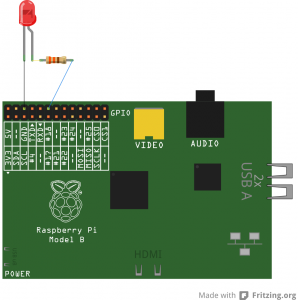
GPIO Wiring
Python and GPIO
A version of the RPi.GPIO python library is bundled with Raspbian Linux, so we’ll just use that for now to keep things simple. The following Python code will configure GPIO pin 18 as an output and then turn it on. This code has to run as root, so you need to save it to a file and then run it with:
sudo python myFile.py
#!/usr/bin/python
import RPi.GPIO as G # reference the GPIO library
G.setmode(G.BCM)     # use the 'BCM' numbering scheme for the pins
G.setup(18, G.OUT)   # Set pin 18 as an Output
G.output(18, True)   # Turn it on
raw_input('Press return to exit')
G.cleanup()          # Tidy up after ourselves so we don't generate warnings next time we run this
To take this to its next level, we can allow for some user input by reading something from the terminal:
#!/usr/bin/python
import RPi.GPIO as G     # reference the GPIO library
G.setmode(G.BCM)         # use the 'BCM' numbering scheme for the pins
G.setup(18, G.OUT)       # Set pin 18 as an Output
while (True):            # keep going around this loop until we're told to quit
  key = raw_input("Enter 'w' for On, 's' for Off and any other key to quit. You'll need to press enter after each character: ")
  if key == "w":
    G.output(18, True)   # Turn it on
  elif key == "s":
    G.output(18, False)  # Turn it off
  else:
    break                # leave our loop
G.cleanup()              # Tidy up after ourselves so we don't generate warnings next time we run this
Python, FastCGI and a web server
This is great, we’ve now got a small program running on the Pi that waits for a human to command it to turn the LED on and off, and then it does as its told, but we can take the next step of hooking it up to a web browser. To do this, we need to turn the Raspberry Pi into a web server and then create a small website on it.
One of the great features of Raspbian Linux is that it’s got a really good repository of software that easy to install, we’ll be calling on that repository to install the lighttpd Web Server and the Flup Python library to help us talk to that Web Server using FastCGI.
Install the web server and start it running using:
sudo apt-get install lighttpd
sudo service lighttpd start
By default, lighttpd runs with a single website that lives in the directory /var/www. We can set up our own website in there by creating a new file /var/www/index.html and putting some HTML in it:
<html>
  <head>
  	<title>Hello from the Pi</title>
  </head>
  <body>
    <h1>Hello world from the Raspberry Pi</h1>
  </body>
</html>
Now when we point a web browser at the Raspberry Pi’s IP address, such as http://192.168.1.104/ (substituting your own IP address into that URL), you should get the hello world message appearing
To hook up our Python to the web server, we need to install a library that helps with the FastCGI protocol. FastCGI is slightly harder to configure than CGI, but it leaves the python script running in memory all of the time, whereas CGI has to start up a new Python interpreter for every request which is slow.
sudo apt-get -no-install-recommended install python-flup
and then change our python script to take its input from Flup instead from raw_input() and so that it runs as the root user. Save the following script as /var/www/doStuff.py and then chmod it to 755 so that the webserver can execute it.
#!/usr/bin/pythonRoot
# bring in the libraries
import RPi.GPIO as G
from flup.server.fcgi import WSGIServer
import sys, urlparse

# set up our GPIO pins
G.setmode(G.BCM)
G.setup(18, G.OUT)

# all of our code now lives within the app() function which is called for each http request we receive
def app(environ, start_response):
  # start our http response
  start_response("200 OK", [("Content-Type", "text/html")])
  # look for inputs on the URL
  i = urlparse.parse_qs(environ["QUERY_STRING"])
  yield (' ') # flup expects a string to be returned from this function
  # if there's a url variable named 'q'
  if "q" in i:
    if i["q"][0] == "w":
      G.output(18, True)   # Turn it on
    elif i["q"][0] == "s":
      G.output(18, False)  # Turn it off

#by default, Flup works out how to bind to the web server for us, so just call it with our app() function and let it get on with it
WSGIServer(app).run()
By default, the /usr/bin/python executable runs as the user that calls it. That’s likely to be either the ‘pi’ user if you’re interactively using it, or the ‘www-data’ user if it’s being run by the web server. An easy to configure way of breaching this security is to user linux’s setuid feature. This is a potentially dangerous technique, so needs a bit of careful thought, but it is easy to set up.
We find out which version of python is being used by default, then make a copy of it named /usr/bin/pythonRoot and then make it run setuid root:
  pi@raspberrypi /var/www $ ls -l /usr/bin/python
  lrwxrwxrwx 1 root root 9 Jun  6  2012 /usr/bin/python -> python2.7
  pi@raspberrypi /var/www $ sudo cp /usr/bin/python2.7 /usr/bin/pythonRoot
  pi@raspberrypi /var/www $ sudo chmod u+s /usr/bin/pythonRoot
  pi@raspberrypi /var/www $ ls -l /usr/bin/pythonRoot
  -rwsr-xr-x 1 root root 2674528 Mar 17 18:16 /usr/bin/pythonRoot
The final step is to configure our web server with its FastCGI module and to tell it where to find our Python script. Do this by editing /etc/lighttpd/lighttpd.conf:
Add a line to the server.modules = () list at the top of the file:
  "mod_fastcgi",

Then add the following block of code to the end of the file:
 fastcgi.server = (
   ".py" => (
     "python-fcgi" => (
       "socket" => "/tmp/fastcgi.python.socket",
       "bin-path" => "/var/www/doStuff.py",
       "check-local" => "disable",
       "max-procs" => 1)
    )
 )

Now restart your web server,
sudo service lighttpd restart
If all has gone perfectly first time (and what ever does?), then you should now be able to turn your LED on and off by calling URLs like this: http://192.168.1.104/doStuff.py?q=w and http://192.168.1.104/doStuff.py?q=s (again, swapping in your Pi’s IP address)
HTML and Javascript
Manually entering those URLs ourselves is all well and good, but who doesn’t like a nice button to push to make something happen? For that, we need to add two buttons and some javascript to our /var/www/index.html. I’m also being lazy and using the Prototype.js javascript library to handle the AJAX requests.
 <head>
  	<title>Hello from the Pi</title>
  	<script src="//ajax.googleapis.com/ajax/libs/prototype/1.7.1.0/prototype.js"></script>
  </head>
  <body>
    <h1>Hello world from the Raspberry Pi</h1>
    <form>
    	<input type="button" value="On" onclick="go('w')" style="font-size:200%;"><br />
    	<input type="button" value="Off" onclick="go('s')" style="font-size:200%;">
    </form>
    <script type="text/javascript">
      function go(qry) {
	    new Ajax.Request('doStuff.py?q=' + qry,
	    	{method: 'GET'}
        );
      }
    </script>
  </body>
</html>
So now when you point your browser at http://192.168.1.104/, the LED should turn on and off when you push the appropriate button!
Outstanding issues and ways of doing this better
As always, my code is up on Github. The most recent version of my code has the most features in, but you can see each feature being implemented by looking at the changes for each commit
The RPi.GPIO python library needs to run as the root user, which opens up all kinds of security hazards for accidents or foul play, one way of dealing with this is to seperate the user input code from the doing stuff code. I did this myself using two Python scripts, or you could use Quick2Wire’s Python API.
Another note on security, it’s always important to not trust any user inputs by checking that they’re what you’re expecting, which is why I mentioned a NAT router at the start. NAT means that you have to go out of your way to allow internet connections directly to your Raspberry Pi, which protects it against casual abuse. Running that script as root means that we’re trusting the web server and our helper libraries to not have their own security vulnerabilities. I’ve not mentioned local security because anybody with a terminal session to your Pi as the ‘pi’ user has got full access to it by default and anybody with physical access can do anything they please.
I’ve used FastCGI because it’s fairly concise to explain, but there are newer and better ways of connecting server scripts to the web these days, such as WSGI and Websockets. If you can assume an internet connection for both your web browser and the Raspberry Pi then you could use a service like Pusher which makes it all very easy.
could you show the code of the script /var/www/doStuff.py ??
Hi Jesus, thanks for taking the time to let me know about the broken link to the gist for that file. I’ve fixed it, so that should now display for you.
thanxs Dav, for your helpful blog but i am little bit confused about configuring web server in pythonRoot an changing mode to 755,,,would you please elaborate in detailed about configuring the server.
Regards..
Hi Sushan. Sure thing, but I need a bit of help from you first so that I know which parts need more details adding to it. How far have you got with setting up the web server? Is the keyboard driven GPIO script working for you? Have you got the packages installed and configured ok? Have you got the plain HTML “Hello World” page displaying on your web browser? Or is it the FastCGI that’s not working?
Hello Dav!
I’m loving your guide, but i have run into an issue when changing the lighttpd config.
Whenever i add the “fastcgi.server=()” lines to the .conf file, the actual webserver refuses to start up.
The only thing that i have done differently is when i installed flup. When i was installing flup it wouldn’t allow me to do so using the “-no-install-recommended”, so i just used “sudo apt-get install python-flup”.
Any ideas on what might be the issue?
Cheers, Thomas
Hi Thomas,
Did you enable the mod_fastcgi module at the top of lighttpd.conf? If yes, there’s a few things that it might possibly be. Have a look in /var/log/lighttpd/error.log and see what, if any, errors have been logged when you start the web server, that might give us a clue to start troubleshooting it.
You might find entries like “2013-03-17 22:43:34: (mod_fastcgi.c.1103) the fastcgi-backend /var/www/doStuff.py failed to start:
2013-03-17 22:43:34: (mod_fastcgi.c.1107) child exited with status 13 /var/www/doStuff.py ”
which could happen if Flup hasn’t started up correctly or if the Python interpreter hasn’t started.
Feel free to post back here, or get hold of me directly by email if you’d prefer
Cheers, Dav
Hi again Dav!
Thank you for your response!
I had added the mod_fastcgi to the top of the config, but from troubleshooting the issue, i concluded that it was the second part that i later added to the config, which caused the issue.
I have no experience working with flup, so i’m hoping you can help me out.
After restarting the server and looking in the logs i found the following messages:
2013-05-28 22:23:56: (server.c.1546) server stopped by UID = 0 PID = 3543
2013-05-28 22:23:58: (log.c.166) server started
2013-05-28 22:23:58: (mod_fastcgi.c.1103) the fastcgi-backend /var/www/control.py failed to start:
2013-05-28 22:23:58: (mod_fastcgi.c.1107) child exited with status 2 /var/www/control.py
2013-05-28 22:23:58: (mod_fastcgi.c.1110) If you’re trying to run your app as a FastCGI backend, make sure you’re using the FastCGI-enabled version. If this is PHP on Gentoo, add ‘fastcgi’ to the USE flags.
2013-05-28 22:23:58: (mod_fastcgi.c.1397) [ERROR]: spawning fcgi failed.
2013-05-28 22:23:58: (server.c.964) Configuration of plugins failed. Going down.
Have you got any suggestions on how to fix this issue? Has it got anything to do with the way i installed flup?
Cheers, Thomas
Hi Thomas,
It’s possible that it’s to do with Python not finding the Flup module, but it might also be as simple as lighttpd not being able to start an instance of Python with control.py. A few simple things that it might be:
Is control.py chmodded so that it’s executable? Can you run it from the shell with ./control.py and it start to do something? (although it will eventually fail because of the lack of the web server)
Does control.py start with a #! line that includes the absolute path to the python interpreter like #!/usr/bin/pythonRoot?
Does /usr/bin/pythonRoot work on its own from an interactive shell without being called through lighttpd?
Flup’s hard to diagnose without a web server, but does this work for you? ”
pi@raspberrypi /var/www/cgi-bin $ /usr/bin/pythonRoot
Python 2.7.3 (default, Jan 13 2013, 11:20:46)
[GCC 4.6.3] on linux2
Type “help”, “copyright”, “credits” or “license” for more information.
>>> from flup.server.fcgi import WSGIServer
>>>
”
Or do you get an error message after importing WSGIServer?
Cheers
Dav
The comments started to get a bit complicated, so Thomas and I took the conversation offline. The part that told us what the problem was came when he tried to run /var/www/control.py from an interactive shell prompt and received the following error:
“pi@raspberrypi /var/www $ ./control.py
-bash: ./control.py: /usr/bin/pythonRoot^M: bad interpreter: No such file or directory”
The clue here is the ^M, which is character 13, the Carriage Return character. Python copes just fine with Windows style line endings, but bash doesn’t, so when it’s parsing the #! at the top of the script to run the correct interpreter, it thinks that the CR character is part of the filename. We fixed it using the ‘dos2unix’ tool that’s installable using ‘sudo apt-get install dos2unix’. I’ve updated the blog post accordingly.
Hi Dav Stott
Thanks for your sharing.
I’ve followed your tutorial step by step. Starting from creating python code to control Pi’s GPIO, it’s success. Next, I set my Pi as web server and creating small website (Hello from Pi), it’s also success.
But in the next step, when I hook up the python in web server, and then I access it from web browser, it’s failed, the web browser can’t connect to the Pi address. I don’t know what I miss from your tutorial.
Can you help me about that sir?
Thanks before.. Regards..
Hi Frint,
There are a few things that might have failed at that step of the process, but it’s most likely that lighttpd either can’t start python or it can’t run the doStuff.py script.
To try to work out what’s wrong, you’ll need to look in lighttpd’s error log file, which is in /var/log/lighttpd. Watch the contents of that file whilst you restart lighttpd and then try to request the web page. That should give you some clues for where to start.
Dav