Energy is one of the biggest problems facing the world today, with an increasing amount of it being converted into compute cycles and heat in Warehouse Scale Computers in data centres around the world. In recent years, the big tech companies have invested an awful lot of time from some very clever people into squeezing more performance out of the servers that drive the products that many of us now take for granted. Indeed, one paper I read recently said that the popular Gmail service wouldn’t have been close to affordable to run without Google’s power efficiency in software and data centre design.
My favourite side-effect of this renewed drive for efficiency is that this also gives us the tools to do lots of fun things on relatively small computers, and make our servers use up less electricity to perform the same tasks. A bit like replacing the air filter on a car engine to let it breathe more easily, each individual tweak might only save a few microseconds here and there, but it can soon add up.
We can’t all be Jeff Dean, and need more than a printf() call to implement a HTTP server, so I’m going to start with a simple technique I used to stop my little Bytemark VM having to do some tasks that just aren’t necessary at all..
Stopping dictionary attacks on wp-login.php with a couple of lines of nginx configuration
One downside of using a popular content management system like WordPress is that many script kiddies like to perform automated attacks on it, looking for people who’ve chosen poor usernames and passwords to edit their content. Unfortunately, that sort of attack causes web servers to get very busy, using up power and generally slowing things down for people trying to do real work. One such attack is illustrated in the chart below, showing my server’s CPU activity over 24 hours from a week or two ago. The data came from sar’s standard logs.
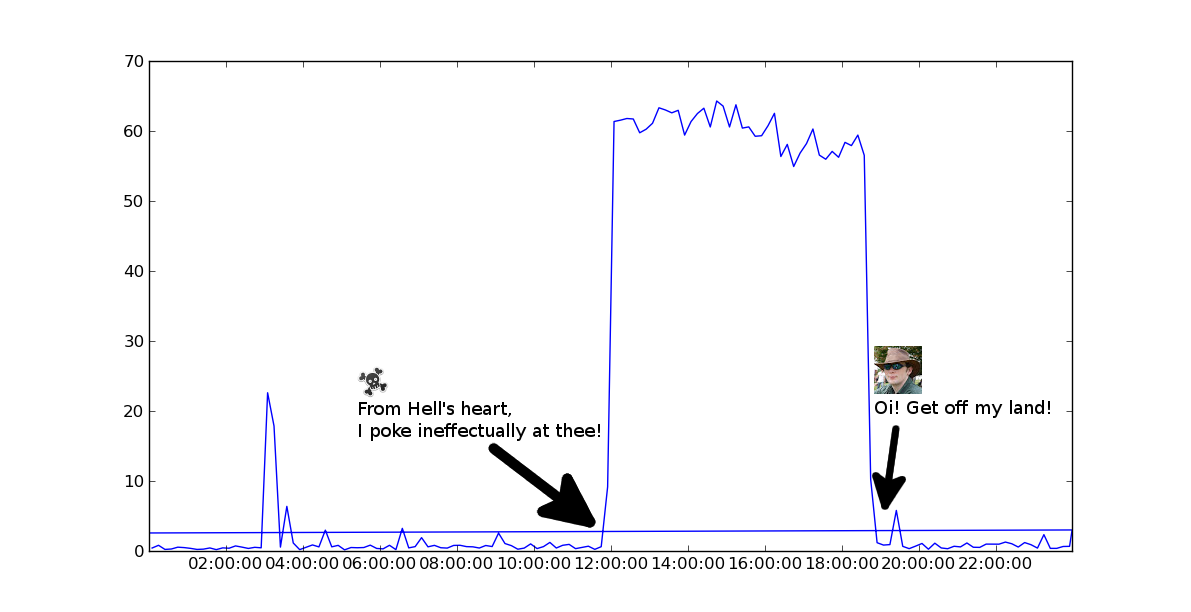
A chart of my server’s CPU activity, the % in use
What could cause such a big plateau of busywork, I hear you ask? It turned out to be a couple of IP addresses with very dodgy DNS names blatting away at my wp-login.php several times a second for hours on end.
I made this traffic go away with a couple of simple nginx configuration directives that made the attacking script believe that my website had gone away after a handful of failed log in attempts.
It’s split into two sections, the first is to add this to nginx.conf’s http{} section. This creates a bucket named ‘myZone’, with a rule that says any content locations mapped to that bucket should not average more than one request per second from a given remote IP address:
limit_req_zone $binary_remote_addr zone=myZone:2m rate=1r/s;
Adding this next stansa into your virtual host’s server{} section (sorry for using the ~ operator, lazy Dav was lazy) maps any URLs containing the string ‘wp-login.php’ into that bucket. The “burst=3†parameter allows me to retry a failed login a couple of times without locking me out of my own website, and consigning error logging to /dev/null means that I don’t waste disk space or webstats on looking at the banned login requests, although there are some downsides to doing that :
 location ~ wp-login.php {

      	limit_req zone=myZone burst=3;

      	fastcgi_pass php;

      	include fastcgi_params;

      	error_log /dev/null;

  }
Whilst this deflects a simple attack from a small number of IP addresses, it wouldn’t help so much if my server was that target of a distributed attack from a large number of IP addresses. This is where cloud-based services such as Brute Protect come into play, letting server administrators share data on failed login attempts into a coordinated pool to try to protect everybody. This plugin runs in PHP, so isn’t as efficient as blocking the unwanted traffic in the web server or firewall, but it’s still useful and doesn’t take much time at all to set up.
Upgrade your PHP and use Zend’s opcache
If you haven’t heard about op-code caches before, I recommend that you read EngineYard’s excellent explanation of PHP Opcode Caches, which includes any amount of detail.
From what I remember of @julienPauli’s excellent talk on OpCache internals at this year‘s PHP London conference, the recently open-sourced opcache works wonders when using frameworks that compile a large number of classes that aren’t used all that often. Rather like my WordPress site.
Unlike APC, Opcache doesn’t just cache the results of compiling your PHP code, it also includes some optimisations, such as replacing i++ with ++i to avoid having to allocate a temporary variable that is never referenced to store the results of the increment. Taken together, these optimisations become significant.
To look at the impact of upgrading to php5.5 and switching on opcache, I’ve charted the difference in the time taken to draw the front page of my blog:
I generated my numbers completely unscientifically by blatting away for a bit at an offline copy of my website using the excellent Siege load testing tool. Almost all of my home computers (maybe not my Raspberry Pi) are way more powerful than my Bytemark VM, and anyway, it’s only the relative difference between them that’s interesting. Enabling opcache means I got a speed increase of about 300% for no extra cost. Nice.
If you’d like a more sensible comparison of PHP versions and op-cache options, this is a good place to start: http://www.ricardclau.com/2013/03/apc-vs-zend-optimizer-benchmarks-with-symfony2/
Use a better malloc(3)
By and large, you get the biggest speed and efficiency increases by improving the code you’ve written for your application and looking at database indexes and structures, but you can get some interesting results by making a very small improvement to code that is called a great many times over a period of months or even years. One such piece of code is the standard C library function that allocates a section of memory for your application, malloc().
I’m not going to dwell on this in too much detail, largely because many other people have already done so, but there are two popular alternatives to glibc’s malloc(): FreeBSD’s jemalloc and Google’s tcmalloc.
Facebook has reported some very good results from using jemalloc for general use as well as speeding up MySQL with it, my favourite key-value store Redis uses jemalloc and it became the allocator of choice for Mozilla starting with Firefox version 3.
That said, apart from Google’s own use of it, GitHub used tcmalloc to sort out their MySQL servers to significantly reduce the time InnoDB spent waiting for kernel_mutex.
Whilst I was reading about this, I tripped over the excellent poor man’s profiler approach to performance profiling, using the standard Linux tools to aggregate a collection of stack traces.